
Cake with Strawberry Filling: Layered Vanilla Cake with a Cooked Filling
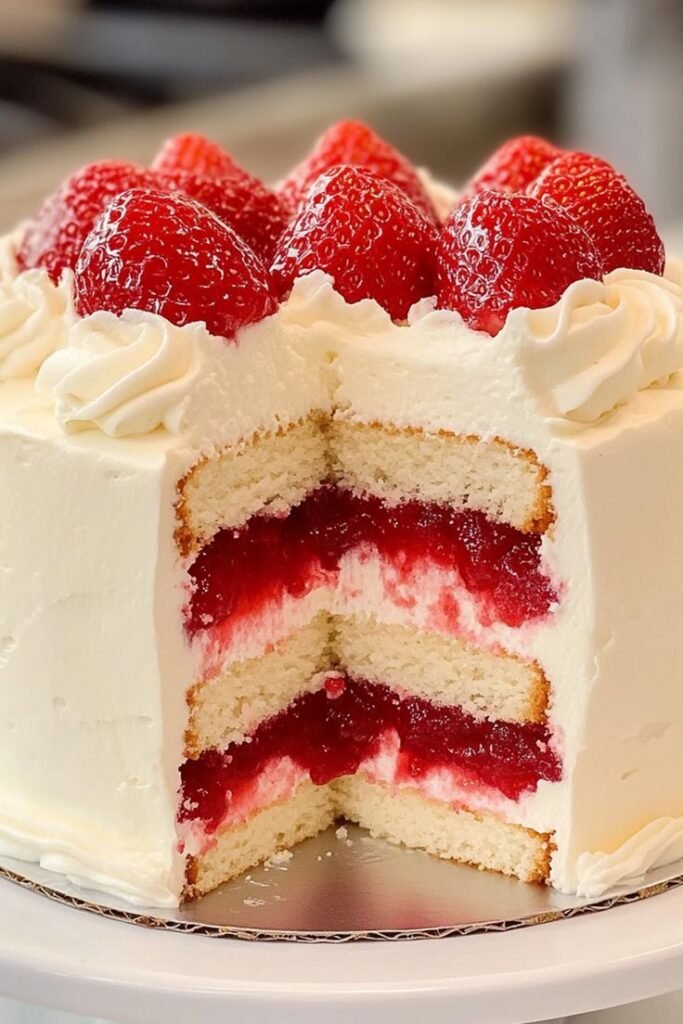
A cake with strawberry filling lives or dies on the filling, so that is where this recipe puts its effort. Two cups of berries get cooked down with a cornstarch slurry until the mixture coats a spoon and holds a track, then cooled completely before it ever touches cake. This is a filled layer cake, not a strawberry shortcake with split biscuits and loose whipped cream, and not a cheesecake. Soft vanilla layers, buttercream, and a wide glossy band of cooked strawberry between them. A piped buttercream dam is what keeps that band exactly where you put it.
Why you'll love this
- The filling is the whole point: cooked with a cornstarch slurry until it is thick and glossy, so it slices in a clean band instead of soaking into the crumb.
- It is a filled layer cake, not a strawberry shortcake. No split biscuits, no loose whipped cream, and none of the baked custard of a strawberry cheesecake.
- Frozen strawberries break down faster than fresh and cost less in February, so this works in any month.
- The buttercream dam keeps the filling between the layers instead of running down the sides while you frost.
- Homemade or store-bought layers both work, so you decide how big a project this is.
- The filling and the layers can both be made a day or two ahead, leaving only assembly.
Key ingredients & how to use them
- Frozen unsweetened strawberries — the whole flavor of the filling, so buy plain berries with nothing added. They go in straight from the freezer and collapse in about five minutes. Berries packed in syrup drag in extra water and sugar, which means a longer cook and a flatter taste.
- Cornstarch — two tablespoons sets two cups of fruit, roughly a tablespoon per cup. It has to be whisked into cold water first, never shaken into a hot pan. Too little and you have sauce; too much and the filling turns chalky and slick on the tongue.
- Cold water — the slurry liquid, and the ratio is the recipe: 2 tablespoons cornstarch to ¼ cup cold water whisks into something like thin cream. Less than that stays pasty and lumps; much more and you spend extra minutes boiling off water you never needed.
- Granulated sugar — ½ cup sweetens two cups of berries and helps the filling set glossy rather than dull. Very tart berries can take an extra tablespoon, but taste first, because the cake and the buttercream are already sweet.
- Lemon juice — one tablespoon, added at the start so it cooks in, and the filling tastes like fruit rather than sweetened jam. Acid does weaken a cornstarch set if you boil it hard for a long time, which is one more reason to stop as soon as it thickens.
- Sponge or vanilla cake layers — three of them, neutral enough to let the strawberry lead, and completely cool. Bake to a top that springs back, a skewer with a few dry crumbs, and 205 to 210°F in the middle. Warm layers melt buttercream on contact.
- Buttercream frosting — two cups does two jobs: the outside coat and the dam that holds the filling in. American buttercream works best here because it firms up in the fridge. If yours droops at room temperature, chill it 10 minutes and rewhip before piping.
- Fresh strawberries — sliced over the top for color and a raw, juicy contrast to the cooked filling. Cut them within an hour of serving and pat the faces dry, because sliced berries weep and leave wet pink pools on buttercream.
How to make it (step by step)
-
1
Whisk a smooth slurry first
Whisk the water and cornstarch together in a medium saucepan before any heat goes on. It should look like thin cream, with no grit dragging on the bottom of the pan. Cornstarch dissolves only in cold liquid; tipped into a hot pan it seizes into white pellets that never break up. This one minute decides whether your filling is glossy or grainy.
-
2
Cook the filling until it coats a spoon
Add the strawberries, sugar and lemon juice, and cook over medium heat, stirring often, for 10 to 15 minutes. The first five minutes look alarming, because the frozen berries melt and flood the pan. Once it bubbles properly the mixture darkens, turns glossy and mounds behind the spoon, and a finger drawn through a coated spoon leaves a line that holds. Taste a cooled drop too: raw cornstarch has a chalky, floury edge that vanishes once the starch has cooked through.
-
3
Cool it completely, no shortcuts
Scrape the filling into a wide shallow dish instead of leaving it in the hot pan, cool it to room temperature, around 45 minutes, then chill it 30 minutes more if you can. It firms up considerably on the way down, so judge the texture cold, not hot. Warm filling melts buttercream on contact, and melted buttercream is exactly how layers slide apart. Bake, level or unwrap your cake layers while you wait.
-
4
Check the layers are baked and stone cold
If you are baking the layers, pull them when the top springs back under a light press and a skewer comes out with a few dry crumbs rather than wet batter. An instant-read thermometer should read 205 to 210°F in the center. Cool in the pan 10 minutes, turn out onto a rack, then leave them alone for at least an hour. Even slightly warm cake will take the buttercream with it.
-
5
Level the domes
Shave the dome off each layer with a long serrated knife, sawing gently as you rotate the cake instead of pressing down. You want three flat discs of similar thickness, because a domed layer makes the stack rock and pushes filling out one side. Brush the crumbs off each cut face so they do not drag through the frosting later.
-
6
Pipe the dam, then fill layer one
Set the first layer cut side up and spread a thin skim of buttercream across it to seal the crumb. Pipe a rope of firm buttercream around the top edge, about half an inch in from the rim and half an inch tall. Spoon half the cooled filling inside the ring and spread it level, no deeper than the dam is tall, roughly ¼ inch. Overfilling is the most common reason filling escapes: the dam holds only what fits inside it.
-
7
Stack, fill again, top out
Lower the second layer on straight, cut side up, and press it down with flat palms until it settles. Look at the cake from eye level and correct any lean now, while you still can. Repeat the skim, the dam and the remaining filling, then set the third layer cut side down so its smooth base becomes your top.
-
8
Chill the stack, then crumb coat
Chill the filled stack for 20 to 30 minutes before you frost it. Cold cake and cold filling stop the layers swimming the moment you start dragging a spatula around them. Spread a thin crumb coat over the whole cake, loose crumbs and all, and chill 15 minutes more until it feels dry to the touch. Skip this and the frosting tears the crumb, leaving brown flecks through the white.
-
9
Final coat, decorate, chill before slicing
Cover the cake with the remaining buttercream, smoothing the sides with the spatula held upright and doing the top last, pulling from the outside in. Add the sliced fresh strawberries close to serving so they do not weep into the frosting. Refrigerate at least 1 hour before slicing, and cut with a long knife dipped in hot water and wiped dry between cuts.
Troubleshooting
- Filling runs out the sides — the dam was too soft, too short, or there was more filling than it could hold. Pipe a firm rope half an inch tall, keep the filling shallower than that, and chill the stack 20 minutes before you frost.
- Layers slide or the cake leans — almost always warm filling, a warm layer, or domed tops stacked on each other. Cool everything properly, level the domes, and if a tall cake still shifts, push a wooden skewer down through the center while it chills.
- Watery filling even after cooling — it never reached a real simmer, so the starch never set. Return it to the pan, whisk 1 teaspoon cornstarch into 1 tablespoon cold water, stir that in, and simmer 2 minutes until it mounds behind the spoon.
- Dry cake layers — usually a few minutes too long in the oven, or overmixed batter. Bake to 205 to 210°F and stop there. To rescue layers you have already dried out, brush each cut face with simple syrup: 2 tablespoons sugar dissolved in 2 tablespoons hot water.
- Domed or cracked layers — the oven is running hot or the pans are too full, so the outside sets before the middle finishes rising. Drop to 325°F, fill pans two-thirds at most, and level off whatever dome you get before stacking.
- Frosting tears the crumb — you frosted a bare, room-temperature cake with stiff buttercream. Do a thin crumb coat first, chill 15 minutes, then apply the final coat. If the buttercream drags, beat in a teaspoon of milk to loosen it.
Pro tips
- Cool the filling in a wide shallow dish, not the pan. A one-inch layer chills in about 20 minutes; a deep pot takes over an hour.
- No piping bag? Use a zip-top bag with half an inch snipped off one corner. The dam does not need to be pretty, it needs to be firm.
- Weigh the batter between pans if you bake your own layers. Equal weights bake evenly and level themselves, which saves a lot of trimming.
- Taste the filling cold before you assemble. Sweetness and acidity both read differently hot, and cold is how people will actually eat it.
- Build on a cardboard cake round set on a turntable. You can spin the cake while frosting and move it later without touching the sides.
Variations & substitutions
- Mixed berry: swap up to half the strawberries for raspberries or blackberries. Sharper and darker, and it sets exactly the same.
- Cream cheese frosting: use it in place of buttercream for tang, but chill the piped dam 10 minutes before filling, since it is softer.
- Lemon strawberry: add the zest of one lemon to the filling and another to the frosting for a brighter, more citrus-forward cake.
- Chocolate layers: chocolate sponge with the same strawberry filling reads like a fresher Black Forest. Keep the buttercream vanilla.
- Two layers instead of three: use two 8-inch layers and put all the filling in one thicker band. Pipe the dam a little taller.
Storage & make-ahead
The assembled cake keeps covered in the fridge for 3 to 4 days; press plastic wrap against the cut face so it does not dry out. Let slices sit out 20 minutes before eating, since cold buttercream tastes waxy. The filling alone keeps 5 days refrigerated in an airtight container or a month frozen, and unfrosted, well-wrapped layers freeze for up to 3 months. Thaw layers still wrapped so the condensation lands on the plastic rather than the crumb. To freeze the finished cake, chill it solid first, then wrap it in plastic and foil.
Serving ideas
Serve the slices cold from the fridge but rested 20 minutes, on plain white plates so the red band shows. A spoonful of barely sweetened whipped cream on the side, a few extra sliced berries, and coffee is all it needs. For a birthday, push the candles into the buttercream border rather than the center, where they sink straight into soft filling.
More recipes to try
Strawberry season moves fast, so I stretch it as far as I can. On a weeknight when I don't want to frost anything, a strawberry shortcake mug cake gives me the same berries-and-cream hit in minutes, and for company I'll make the strawberry cheesecake instead. But when cake means dinner at our house, I make Dungeness crab cakes.
Recipe
Cake with Strawberry Filling
A layered vanilla cake with a cooked-from-scratch strawberry filling, held between the layers by a piped buttercream dam.
Ingredients
- 2 cups frozen unsweetened strawberries
- ½ cup granulated sugar
- 1 tablespoon lemon juice
- ¼ cup water
- 2 tablespoons cornstarch
- 3 layers sponge or vanilla cake (baked or store-bought)
- 2 cups buttercream frosting
- Fresh strawberries, sliced, for decoration
Instructions
- Make the filling: whisk the water and cornstarch together in a medium saucepan until completely smooth. Add the strawberries, sugar, and lemon juice.
- Cook over medium heat, stirring frequently, for 10–15 minutes, until the mixture thickens to a jam-like consistency that coats the back of a spoon. Remove from heat and let cool completely, then chill if time allows.
- Level any dome off the cooled cake layers. Place the first layer on a serving plate, spread a thin layer of buttercream, pipe a firm buttercream ring around the outer edge, then spread half the cooled strawberry filling inside the ring.
- Add the second cake layer and repeat with buttercream, a piped ring, and the remaining filling.
- Top with the third cake layer and chill the stack for 20 minutes, then frost the outside and top with the remaining buttercream.
- Decorate with sliced fresh strawberries. Refrigerate for at least 1 hour before slicing and serving.
Nutrition · per serving (estimate)
Made this recipe?
Tap the stars to leave your rating — it helps other home cooks.
Frequently asked questions
Can I use fresh strawberries instead of frozen?
Yes. Use the same weight of hulled, chopped fresh berries. They release a little less liquid, so the filling may thicken a couple of minutes sooner; go by the spoon-coating test rather than the clock. Frozen berries are simply cheaper off season and break down faster.
Do I have to thaw the frozen strawberries first?
No, add them straight from the freezer. They thaw and collapse in the pan within about five minutes. If the bag is heavily iced, expect an extra two or three minutes of cooking to drive off the melted ice.
Why is my strawberry filling runny?
Three usual causes: the cornstarch was not whisked smooth into cold water, the mixture never came to a proper bubble, or you judged it while it was still hot. Cornstarch has to reach a simmer to set, and the filling firms up a lot as it cools. If it is still loose when cold, whisk 1 teaspoon cornstarch into 1 tablespoon cold water, stir it in, and simmer 2 minutes.
How do I stop the filling leaking out between the layers?
Pipe a rope of firm buttercream around the edge of each layer, about half an inch in from the rim and half an inch tall, then spoon the filling inside it. Keep the filling shallower than the dam is tall. Overfilling defeats the dam, and so does warm filling or a warm cake.
How do I know the cake layers are baked through?
The top springs back when you press it lightly, a skewer in the center comes out with a few dry crumbs rather than wet batter, and the edges have just started to pull away from the pan. An instant-read thermometer should show 205 to 210°F in the middle. Pull them there, because extra minutes are what make layers dry.
Can I make the strawberry filling ahead of time?
Yes, and it makes assembly much easier. It keeps in an airtight container in the fridge for about 5 days, or in the freezer for a month. Take it out roughly 20 minutes before you need it so it is spreadable but still cold, never warm.
Can I use store-bought cake layers?
Absolutely. Boxed-mix or bakery sponge layers work fine, since the cooked filling is what makes this cake. Just level any domes and make sure the layers are at room temperature, not warm. That cooked filling is also what separates this from strawberry shortcake, which uses split biscuits and whipped cream with no cooked filling at all.
Can I use jarred strawberry jam instead of cooking the filling?
You can, but it makes a different cake. Jam is much sweeter and looser at room temperature, so warm it slightly, spread it thin inside the dam, and expect more spread once the cake is stacked. Cooking your own gives you whole pieces of fruit and control over the sugar.
Can I freeze the cake?
Freeze the components if you can: well-wrapped unfrosted layers keep 3 months and the filling keeps a month. A fully assembled cake can be frozen once it is chilled solid, wrapped in plastic and then foil, for about a month. Thaw it overnight in the fridge, still wrapped.
Why do I refrigerate the finished cake before slicing?
Chilling firms the buttercream and the filling so the layers set as one piece. A cold cake cuts into clean wedges, while a room-temperature one tends to slide and squeeze filling out the side. One hour is the minimum; overnight is better.
Leave a review